As much as I enjoy my Olympus EM5 Mark 2, I rarely invest in the system. Since the imaging arm of Olympus was sold off and rebranded under the OM Digital Solutions name, I admit that Micro Four Thirds has lost some lustre. It is, of course, a fantastic lightweight system and it would be nice to see Panasonic continue the format under their Lumix brand, though I fear that many camera manufacturers see 35mm sensors as the biggest cash-cow at this point.
It was with some surprise that I discovered the Yongnuo 25mm 1.7 lens for Micro Four Thirds. It’s a Chinese-made product and features a quiet auto-focus motor, which is unusual in such a cheap lens. The body is all-plastic, but it feels and looks good. It’s also the fastest Micro Four Thirds lens I own.
Dreamy vibes from a cheap lens
I made the photo with the lens wide open at F 1.7. The sun flared across the frame, resulting in a soft and dreamy look. It’s pretty sharp in the centre at an aperture setting of 1.7, with the edges and corners looking soft. There’s also plenty of chromatic aberration, especially in high contrast areas, but I think all of this adds to the mood of the photo.
Siloes at sunset – Yongnuo 25mm 1.7 lens
Just before the sun dipped below the horizon, I set the Yongnuo lens to F 2.2, just to sharpen things up a little, and made this photo. I really like the rendering of this lens so far and I think I’ll be packing it for our upcoming roadtrip.
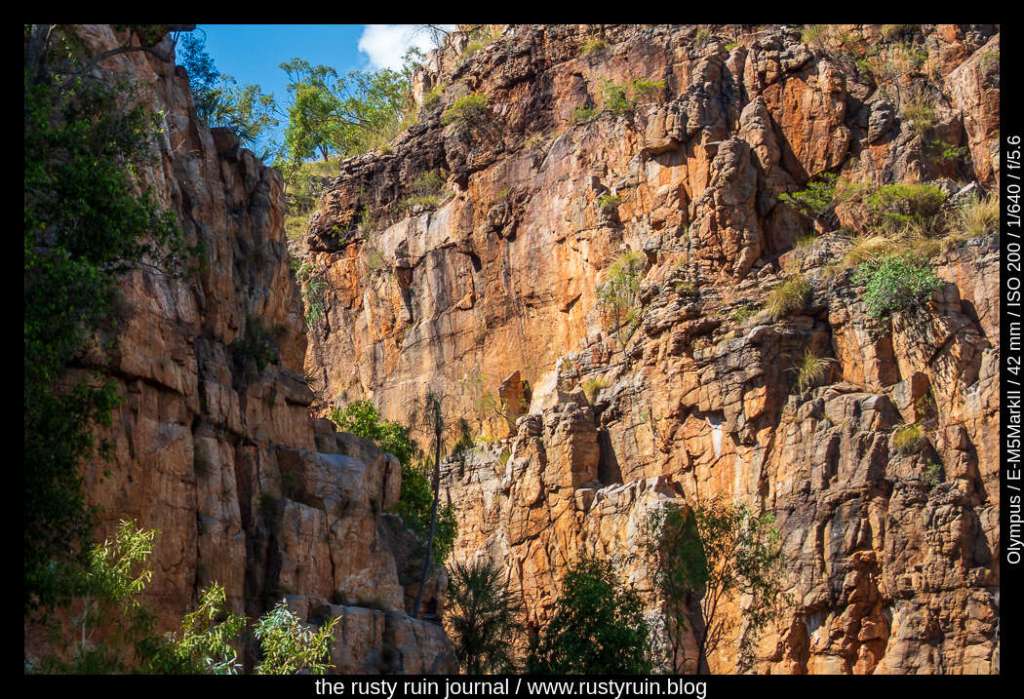
To the local Jawoyn people, the amazing gorges in Nitmiluk National Park(Katherine Gorge) hold special significance. We were fortunate enough to book a short cruise to see some of the many wondrous gorges in the area and view the ancient sandstone rock formations, calm waters, and freshwater crocodiles. This is an area teeming with life and Dreamtime stories.
Nitmiluk National Park, one of the gorges – Olympus OMD EM5 Mark 2 and 14-42 kit lens
Sunlight at the height of the Australian afternoon can be harsh. This is one reason I prefer viewfinders rather than the big LCD screens on so many cameras that get washed out in these conditions.
The soft golden light of dawn or dusk brings out the best colours in the outback landscape, but trip timing doesn’t always permit, and you have to work with the tools you have and the light available when the opportunity arises. One quality this strong afternoon light does emphasise: all the textures on the ancient sandstone.
On the day, I packed lightly since I’d been lugging a not insignificant amount of camera gear around on other days (hello Lowepro Nova 200). The Olympus EM5 provides good image quality and lots of control in a small package. It’s just a small pity I’d also decided to take the 14-42 kit lens with me. That’s not to say that kit lenses are bad at all. Nikon makes some great kit lenses, such as the 18-55mm. And this Olympus Zuiko kit lens is no slouch in the image quality stakes – it does pretty well for a cheapish plastic lens. But at times when I want more sharpness to record all of the landscape’s details, it gets a bit fluffy and squishy at the edges of the frame. Still, you work with what you have and the conditions of the day.
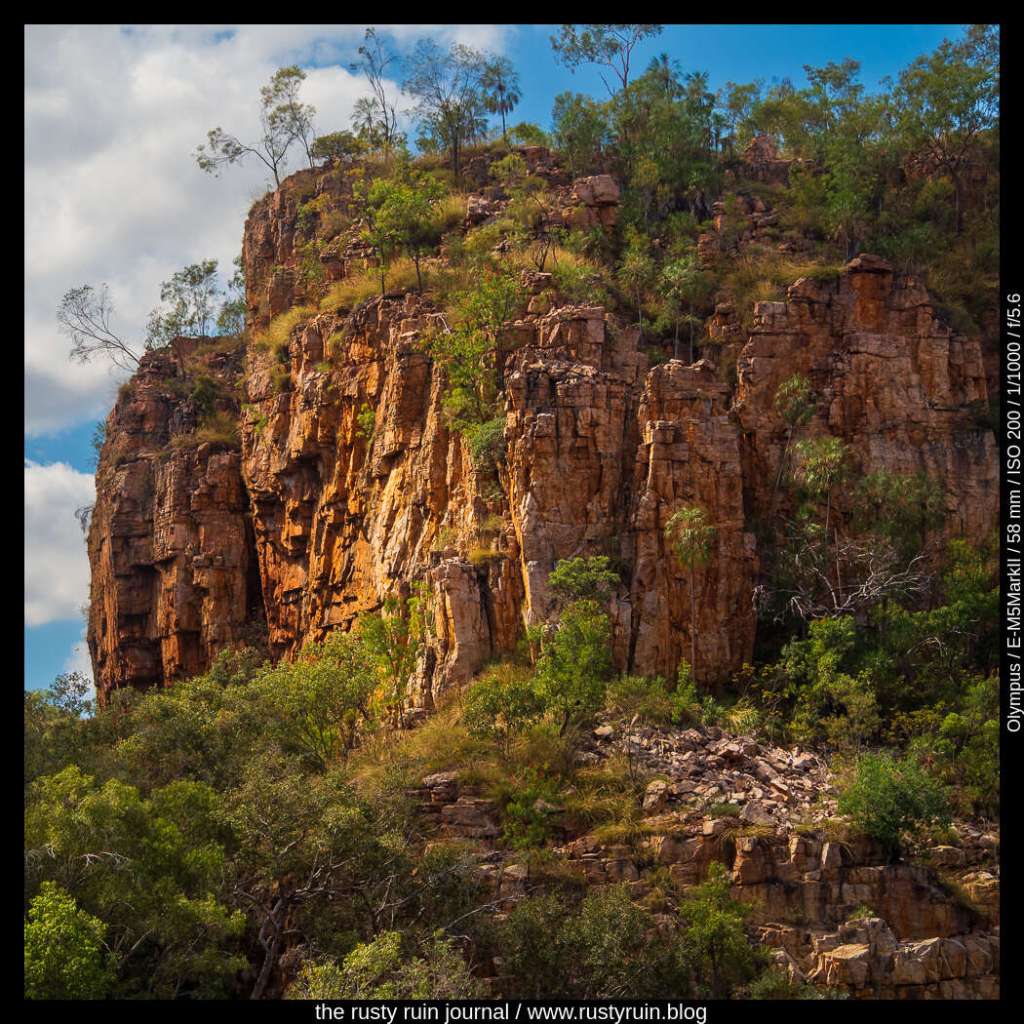
Nitmiluk National Park – Olympus OMD EM5 Mark 2
I’ll always say that eye-watering sharpness is generally overrated in photography, but there are times when sharpness is another tool you want in order to communicate certain qualities – the texture of the rocks in this case. Despite some of the shortcomings of my kit lens, careful subject selection, use of exposure compensation to retain as much detail as possible in high dynamic range scenes, and some boost to the red/orange/yellow colour channels during editing helps to make the photos shine. I also reduced highlights to reveal the details of the ancient sandstone.
A patch of sunlight illuminates ancient rock – Olympus OMD EM5 Mark 2 and Zuiko 40-150mm lens
As the clouds grew heavy, the light conditions became a little more forgiving. As you can see in the above photo, clearing clouds also provided an opportunity to record sunlight as it illuminated sections of rock. I used the so-called plastic fantastic 40-150mm Olympus Zuiko lens for this photo – small, light, and really quite sharp at most focal lengths. I guess the message is to know your camera gear and accept and make best use of your tools and the conditions. I’ll freely admit to not knowing all of my gear well enough at times!
Winter seems to have finally arrived and the looming long weekend here is threatening rain and wind. Not fantastic conditions for photo-walks, of course, but some interesting details can usually be found for the lens even on grim days. On this cold night, after a day of work, I’m scouring the file folder and not seeing aything that fires the imagination too much, so a loose photo assortment follows.
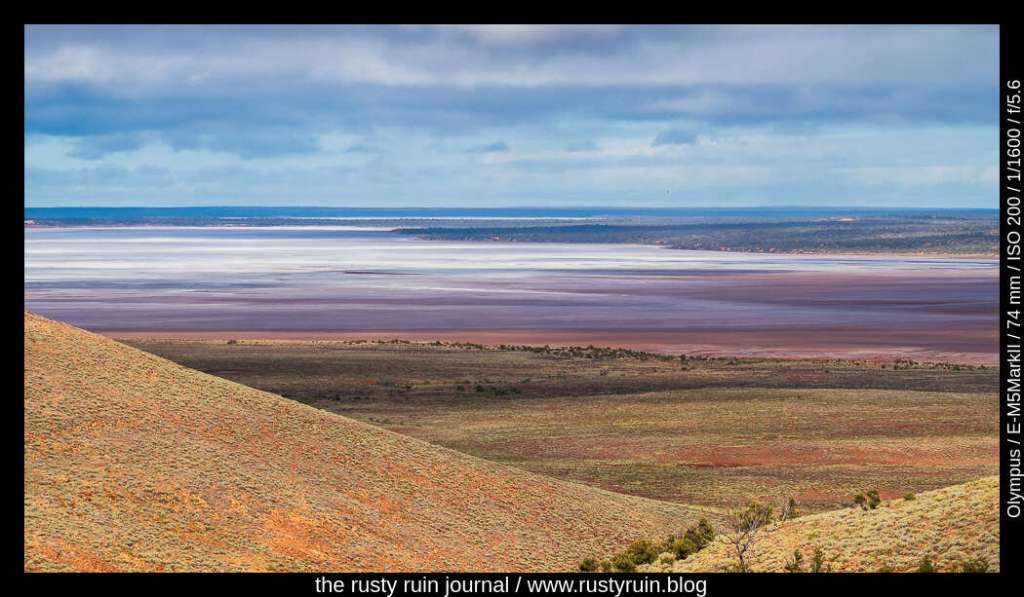
Lake Hart, SA Australia – Olympus OMD EM5 Mark 2
I like the coloured layers in this photo. Driving into the outback not far beyond Port Augusta, lies Lake Hart ~ a vast inland salt lake that’s easily accessible from the rest area and car park. The salt crystals crunch underfoot and the moisture below this top layer gets muddier the further you walk out.
Rusted and overturned car – Olympus OMD EM5 Mark 2
So often, we miss finding an interesting subject to photograph when the sun moves low and the light turns golden. On this occasion, after a day of driving through the Australian outback, we spotted this overturned and burned out car. The sunset rays hit the rusty body just right so that it glowed gold and red and orange. I must have made a dozen photos and this was the only one I was happy with. Always good to get close-up to subjects like this too.
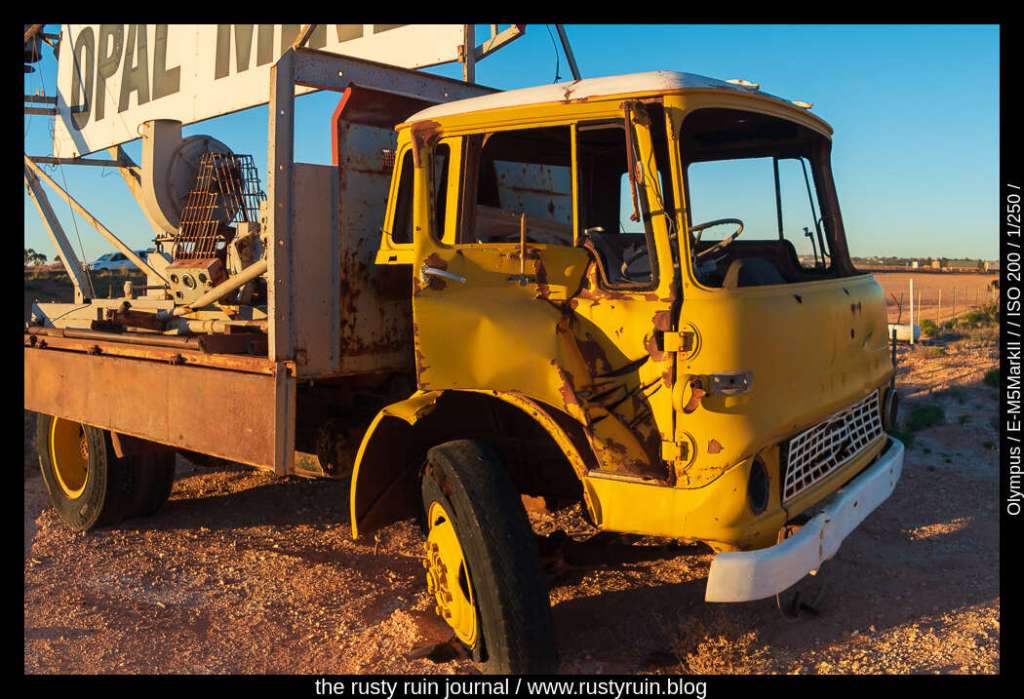
Opal mines hereabouts – Olympus OMD EM5 Mark 2 and Zenitar 16mm Fisheye lens
Have you noticed that I’ve posted very summery and warm photos on this wintry eve? This vehicle has seen better days, for sure. It’s used as a signpost around Coober Pedy now.
If you believe the more scurrilous online rumours, the quality of a camera lens from the former Soviet Union was directly proportional to the Vodka consumption of weary factory workers. This is not the colourful fancy one might suppose, as any factory line embedded in an economic and socio-political culture where wages are neither incentive nor punishment is more likely to be driven by exhausted hands and eyes.
None of this suggests that any cheap trinket or fast fashionable piece made today in vast factory cities by exploited workers and then sent abroad to be marked up for huge profits is any better. Always, there are grifters and exploiters taking advantage of the vulnerable and the gullible. But anyway…I digress slightly. The source of my Soviet-produced lensbeyond the factory floor is not a story for today.
The Zenitar 16mm 2.8 Fisheye lens is an impressive piece of Cold War glass. It’s a hefty thing in the hands, has a distinct and very short hood, a lens cap that can’t be used on any other lens, and looks great when the sunlight bounces off the large curved glass that sits right out front. On my trusty Olympus EM5 Mark 2, this 16mm Zenitar has a field of view equivalent to a 32mm focal length in 35mm format. So, if I was using it on my Z5, which has a 35mm sensor, the field of view is the native 16mm. Because my Olympus has a digital sensor that’s half the size of the one in my Z5, I double the 16mm to a field of view of 32mm instead.
Trudging through swampland at mid-afternoon – Olympus EM5 Mark 2 and Zenitar 16mm Fisheye
My copy of the lens is sharp enough at apertures F 5.6-8, and even at those settings the corners display a lack of sharpness that’s more fizzy than actually mushy – as though details are being pulled away from the centre and slightly distorted. The effect reminds me of using a plastic lens but I don’t find it unpleasant.
Capitalism harms us all – Olympus EM5 Mark 2 and Zenitar 16mm Fisheye
As with other wide angles, and certainly with all Fisheye lenses, there’s distortion. You can see how the normally straight cortners of the skip bins in the above photo look bowed. I don’t have an issue with it, as this is just a feature of the lens, but it’s not the sort of lens you want if you desire pleasant portraits, straight horizons, and distortion-free buildings (using the Nikkor 16mm 2.8 lens profile in Lightroom will straighten out most of the distortion if you really want that).
Lenses like this are great for getting in very close to a subject to take advantage of the optical distortions they produce. On the Olympus, however, the Fisheye effect is certainly much less because of the smaller sensor size, making it a really valuable wide-angle lens if you don’t mind manual focus, fizzy corners, and the chance that the quality of your copy may have suffered due to the effects of authoritarianism and the revolutionary whims of Vladimir Lenin.
I’ve been trying to get out for shorter photo sessions in recent weeks because it’s not always possible to find a free day for an organised day-trip. At the very least, it gives me a chance to find some new locations and subjects. I can also pack a few older camera bodies and lenses without placing much pressure on myself to come back with plenty of photo winners. So, what do you do when the clouds are heavy, time is limited, the light is failing, and interesting subjects are lacking? Well, I happened to spot an interesting looking tree by the side of the road:
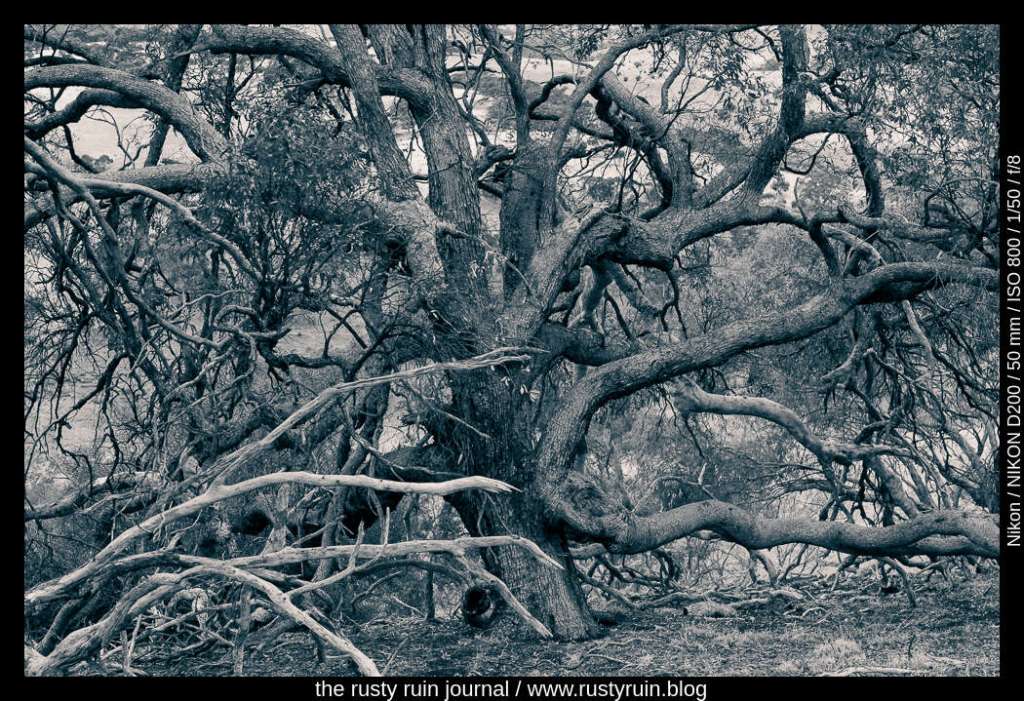
Twisting against the failing light – Nikon D200 and Tamron 17-50mm 2.8 lens
I don’t usually convert colour photos to black and white but sometimes it’s a good way to explore other qualities of an image. Black and white emphasises tonality, texture, and geometry. Just look at all of the twisting branches in the photo above. Even at ISO 800 in dull light, the Nikon D200 produces little noticeable noise. I didn’t bother to apply any noise reduction at all since the digital noise pattern is quite fine.
Here’s another version with more contrast, blue shadows, and warm highlights:
We looked up at the huge rocky dome, in awe of the ancient geological processes that had created it. Over 500 million years ago, before dinosaurs wandered the lands around the ancient sea that would one day become a national park and tourist attraction,Uluru and Kata Tjuta started to form. At such times, you realize the scale of the world around you and feel very small indeed.
Looking back in time: Uluru – Nikon Z5 with Nikkor 40mm F2 lens and Circular Polariser
Doing the 10km base walk is the best way to appreciate the vastness of Uluru. We were already exhausted from our 8km hike through Kata Tjuta the day before – those rocky slopes and winding pathways can be unforgiving on cheap hiking shoes! I once climbed Uluru in about 45 minutes, back when it was commonly known as Ayers Rock. No-one is permitted to climb it now, but you can still see the old climber’s entrance and the worn path that millions of tourists braved over the years.
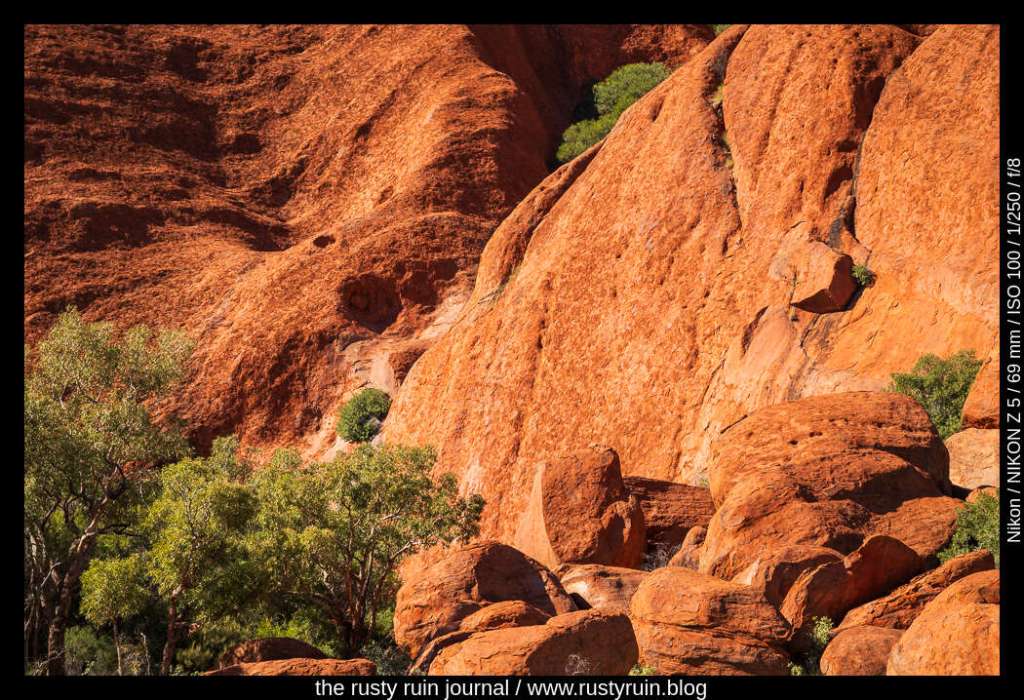
From a distance, Uluru looks like it has quite a uniform surface, but up close is where you get to see the details – weathered sections of grey stone, streaks of white, dark caves that seem to make recognisable patterns, and the iconic red rock that signals high iron content. Both Uluru and Kata Tjuta were formed over millions of years as the soft parts of the Petermann Ranges were eroded, leaving only the boulders and rocks.
Uluru up close – Nikon Z5
Uluru takes on different colours, depending on the time of day and season. It can be bright orange at sunset one moment and then pink with purple and blue shadows the next. I posted a sunset picture in another post, though it was a rushed pull-over to the side of the road and the local police weren’t too happy we’d parked in a no-park area as they beeped us on a drive-by! You take your chances when you have a camera in-hand. There are some designated photo spots in the area for tourists, but they can be quite busy, and I’m not always best pleased to make photos that everyone else does.
The red bones of ancient Australia – Nikon Z5
I was more prudent in my use of the circular polariser on this trip. Hiking around the base of Uluru, I was mindful of the location of the sun. The polarising effect is strongest when the sun is at a 90-degree angle to where you’re pointing the camera – so either on your left or your right. I dial it up so that the effect is strongest, and then dial it back a bit to add more natural stray light reflections back into the scene.
A polariser is fantastic for cutting out stray reflections on foliage and rocks and for deepening colours, but it can also make a scene look flat and darken clear Australian skies to the point of ultra-violet. It’s important not only to be mindful of where the sun is but also whether a polarised photo is what you want. Great for foliage and cutting out reflections on water, but not so useful when you want to preserve all the golden colours of a sunset. It’s also not useful in shady areas, so there was a whole section of the base-walk where I put it away.
Uluru detail: weathering and streaks – Nikon Z5
I’ve often thought of Uluru as the rocky heart of Australia, located not too far from Alice Springs. Amazingly, this monolith extends up to 6 km underground, so it’s much like a rocky iceberg. Absolutely worth visiting if you’re ever in a position to do so.
Some years back, I remember making photos of an Australian White Ibis – a wading bird that’s native to the country. It was a very sunny day and there was lots of light and shadow. In other words: lots of dynamic range for the camera to manage. Fortunately, the Nikon D7100 manages dynamic range pretty well and still stands up as a solid crop sensor camera today.
By my own admission, I was rushing and didn’t choose settings carefully enough. Here’s what the original photo looks like:
Australian White Ibis (original) – Nikon D7100
You can see how much dynamic range is in the photo – the feathers are bright white in the sun, and the interesting part of the photo – the head of the bird – is mostly in shadow. I probably should have switched to Spot Metering and focussed on the head of the Ibis to lift those shadows and preserve detail. That would also have blown out more of the bright parts of the feathers, so there’s a choice to be made. The other option is using a tripod and bracketing the shots to find a better exposure or stack them for an HDR edit to preserve as much dynamic range as possible. But it’s a living creature, and messing around with settings is not always ideal.
I had a stab at editing this old photo in Lightroom to see what could be done with it:
Ibis in blue – Nikon D7100
As you can see above, I was able to pull an impressive amount of detail from the Shadows. Despite the feathers looking blown out, I was also able to recover a lot of detail by pulling down the Highlights. I cropped to a 16:9 ratio to emphasise the length of the Ibis and the beak. Cropping out part of the highlights on the feathers brings more attention to the head of the bird and lessens the visual distraction of the bright white. I think it also balances the serpentine curves of the Ibis as the eye is drawn up the body, over the head, and down the beak.
I masked the background out and made the exposure, shadow and highlight adjustments seperately on the Ibis. By using a mask like this, my edits didn’t affect the background at all, and enabled me to duplicate and invert the mask and then alter the hue of the background through a colour dropper selection. Additionally, I applied a colour mask to the head of the Ibis and raised the exposure slightly, just to bring out even more detail. Finally, I converted to black and white and then applied a global colour in the Split Toning panel to create the cyan look. This is a simple way of emphasising texture and tone, and hiding stuff like chromatic aberrations or visually distacting colours.
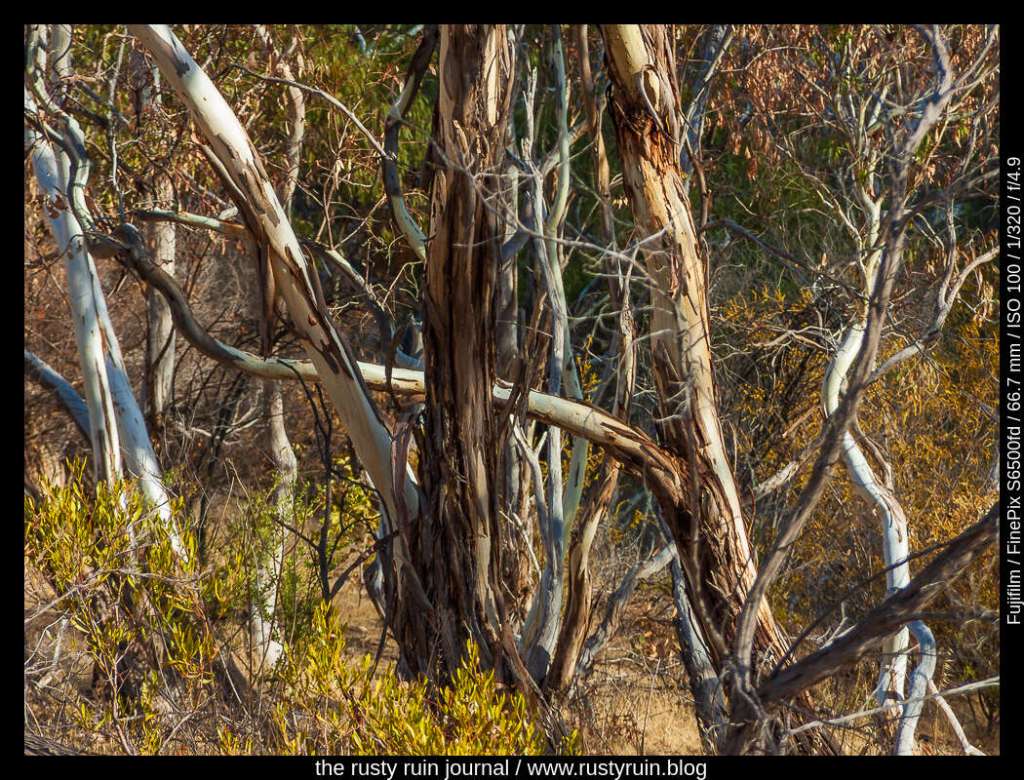
It was the perfect afternoon for us to ramble along a walking trail through century old goldfields nearby. I’d decided to pack the Nikon D40 and the Fujifilm S6500fd. I totally forgot about the Sony RX100 sitting in the zipper pocket of my camera shoulder-bag – the usual go-to in case an old camera flakes on me. I’ll say this about the Finepix S6500fd: the combination of the tiny Super CCD sensor – ancient in digital photography terms – and the long, sharp lens, produce some really interesting photographs at times.
Ghostly gums – Finepix S6500fd
Setting the camera to the Fuji-chrome setting and Fine JPG seemed to enhance the blues and purples in this photo. Maybe it was the combination of the cloud, sunlight, shade, subject, and white balance, but there’s a really strong look to the image. I haven’t added additional colour in editing.
Gum trees along the trail – Fujifilm Finepix S6500fd
For the above photo, I decided to set the camera to generate RAF files – CCD-RAW in the settings menu. I wasn’t even sure they’d open in Lightroom, but they did, and I’m pretty pleased. This provides more latitude and flexibility during editing. As you can see above, I was able to draw out pretty good detail in the shadows and sharpen the image in specific areas. It’s not easy to see without magnifying in Lightroom, but there’s some beautiful detail and tonality in the bark. Hard to believe from this piece of old gear.
Beneath the bark – Finepix S6500fd
Finally, one of my favourite features on old bridge cameras is the Macro and Super-Macro modes, at the touch of a button. It’s so handy for getting up close when there’s good available light for a decent shutter speed. I usually wander handheld, so there’s no tripod involved. Steady hands and good light are a must under these circumstances. It’s a JPG (wish I’d set to CCD-RAW), but the colour and range of tonality is still impressive. The best photos from this camera, like the S7000, seem to have a versimillitude about them. Note to self: set this camera to make RAF files from now on!
It’s a public holiday and I’m working my way through old photos in hopes of finding some stray winners I’d forgotten about. I’ve always been my own biggest critic, editor, and curator. I think it’s good to develop our own tastes as photographers over time. It’s important to connect to our own photos without judgement, reflect on the image and the subject choice, consider the chosen settings, and remember our original photographic vision for the scene versus the actual image.
The key is to do this without judgement. Not every photo is going to meet your developing creative tastes. Not every photo is going to work at a technical level – some will be blurry, some will be rushed, some subject choices will seem odd, and some photos will seem dull. All this is absolutely OK. It needs to happen for growth to happen.
Sundial on a cloudy day – Olympus EM5 Mark 2 and Zenitar 16mm 2.8 Fisheye lens
I love the way the sunlight hits the sundial to reveal the texture of the metal in the photo above. All of the rust spots, built-up debris, weathering, and patina is visually interesting. The old Zenitar Fisheye would be a specialist lens on a 35mm camera, but on the half-sized sensor of the Olympus it works out to an equivalent focal length of 32mm and functions as a nice wide lens with a sharp centre and mushy corners. In situations where I want to get close and get in as much of the scene as possible, it’s a great lens.
There’s a little blown out highlight right up the top, but blown highlights and blocked shadows are not necessarily bad things, and in the above photo it’s very small and not distracting. There are so many other elements that make up a photo! Consider these questions: is there any detail in the highlights/shadows that you want to preserve? Will preserving those details add to your photo? If you make a photograph and part of the image features a glowing light bulb, for example, should you decrease the exposure to bring down this highlight so that the filament inside the bulb can be seen? Will doing this compromise other elements in your photo? How integral are those highlights and shadows to your photographic vision? Instead of the sensor having to manage dynamic range that exceeds its capabilities, can you simply reframe the image instead to include less heavy highlights/shadows?
Cheapo Mad Max – Olympus E1
In the photo above, my decision to focus on the car door was made easy by the fact that the window at the top was allowing in a lot of light. The E1 has an old sensor that doesn’t manage high dynamic range so well, so it made sense for me to cut out most of the light from the window in my viewfinder composition so as to preserve the details in darker areas and on the car door. In effect, the old sensor didn’t need to work so hard to contain all of the dynamic range in the scene.
The red paint on the left, the curved red painted area to the bottom right, and the window at the top all serve to frame the weather-beaten door and its message. It may not be the most exciting photo in the world, but it works for me and it’s a good example of connecting a scene to a photographic vision through careful composition and technical knowledge. I’ll be the first to admit that I’m not always good at that and plenty of photos don’t meet my own tastes, but I keep learning.
In my previous post, I revealed a cache of old photos I’d discovered on a hard-drive backup. Apart from giving me an excuse to go into Lightroom and do something that isn’t related to my day job, it also provides me an opportunity to reflect on why I made those photos. What was my intent? What did I find interesting at the time? What scenes and subjects caught my eye and why?
Painting in the details – Olympus EM5 Mark 2 and unknown vintage lens
I really like the way the painter seems to blend in with her mural. She’s leaning forward at just the right angle so that her body almost becomes part of the skin tones and the angle of limbs on the wall. Her bright yellow hair also contrasts well against the blue paint. There’s colour, shape, contrast, and detail – all providing a visual feast for the viewer’s eyes.
Ripples and shadows – Olympus EM5 Mark 2
There’s something wonderful about the way water reflects and bends light. In the photo above, the setting sun provides gloomy and interesting light that plays across the surface of the water. The ripples themselves form an interesting pattern, leading the eye in a circular motion to the silhouette of the duck and the tree stump. I also love the way that the shadows of these subjects are distorted by the ripples and lead away and out of the photo to the edge of the frame.