More photos from the Pentax K10D

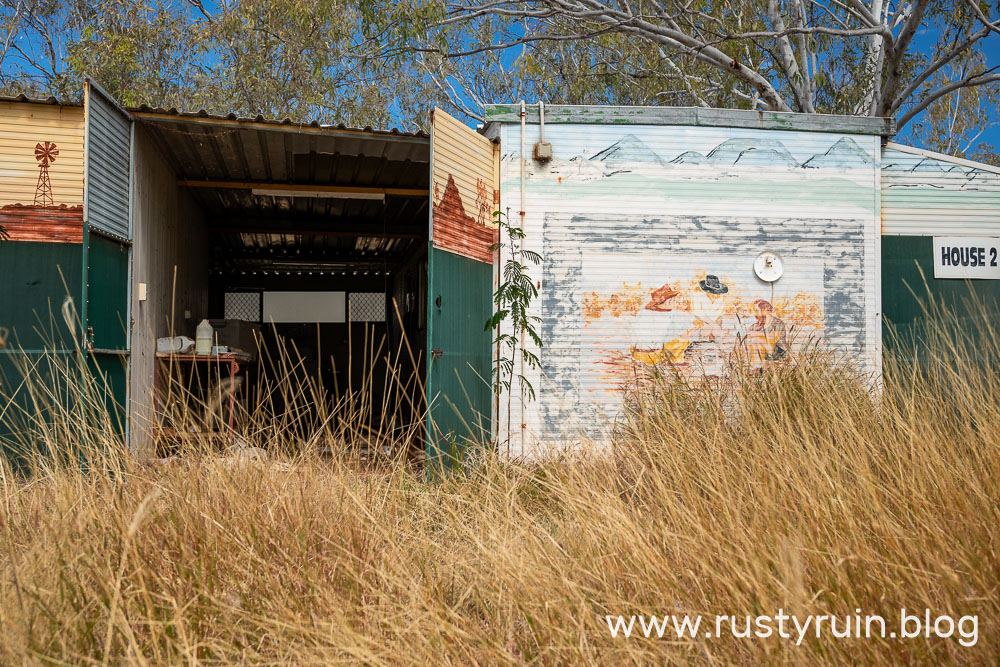
As disappointed as I was in my last post about the Pentax I recently acquired, I managed to make some decent photos on the day. The small backscreens on old cameras aren’t good enough to determine much of anything about sharpness or focus, so I usually make a few photos of the same subject to have some redundancy in case of faults and errors.

Old bridge over the Broughton River – Pentax K10D

I think sometimes we get too used to the idea that every photo should be as sharp as possible. It’s a common criticism in photography groups, of course. But what constitutes sharpness in a photo? Good focus is one primary ingredient – something I struggled with on the Pentax. Contrast is another characteristic that contributes to the perception of sharpness. Aperture size is also important, as this determines depth of field and just how much of a photo is going to be in focus and acceptably sharp. A fast enough shutter speed if a tripod isn’t being used is also key to avoiding blurry photos.

The old dumping ground – Pentax K10D

I don’t know about you, but my eyesight isn’t good enough to see the world like the best lenses. I can zoom in on a super sharp photo in Lightroom and see all the details. That’s a wonderful thing and I’m often amazed at how much detail modern lenses and sensors can resolve, but acceptable sharpness is also a range within which a photo looks good to our eyes. There are well-known lenses from every manufacturer that aren’t known to be super sharp, yet I’m sure many excellent photos have been made with them.

Free book library – Pentax K10D

Inexpensive kit lenses often receive criticism from people who view the technical quality of gear as primary markers of status and image quality. If you’ve chosen the correct aperture, correct ISO, correct shutter speed, and the correct point of focus for the scene, the rest is down to technique, content, and composition. A lens that’s not super sharp can certainly produce wonderful photos of subjects that are a good fit for the glass. Great content and compostion will always beat out slightly soft photos every time in my books. As I’ve said before, amazing photos were made over a century ago with equipment we’d consider primitive when contrasted to the camera gear of today.

Have I become a Nikon fan, unwittingly?

When I look in the cupboard, I see lots of cameras and lenses – some would say, rather too many! Plenty of my film cameras are still piled up in boxes, so they barely add to the shelved pile. Poring over my digital cameras and lenses specifically, I see a growing number of Nikon branded things. I wonder if I’ve become brand loyal? I’d certainly not describe myself as a person overly concerned with brands!

Coober Pedy – Nikon Z5

Identifying with brands

There are lots of people who adore certain brands. By identifying with a brand, we express something of who we are. We recognise some characteristics in the brand that strike a chord within us. We announce to the world: “This brand expresses who I am or who I want to be!”. Perhaps the brand expresses qualities we aspire to demonstrate in our own lives? Perhaps it reinforces a self-perception that we’d like others to notice? Brands are symbols that can be important to our identities, and the most successful brands resonante more strongly with larger numbers of people.

You could say that brand Nikon is doing something right after being so long in operation. The Nikon Corporation has been around since 1917 and has become a household name in that time. They know how to make great cameras, but that’s not to say that Canon or Sony don’t also make great cameras. They certainly do! And they have their own branding and marketing. Truthfully, I’ve often felt that Nikon have been pretty terrible at marketing their gear. It’s great engineering, but companies like Canon and Sony often seem to have had more attractive marketing campaigns over the years.

So, I guess I’m wondering why I open up my cupboard and see a growing bunch of Nikon cameras staring back at me – what does it say about me? Am I now a brand fan?

Through the pass – Nikon D70

How I got started

The truth is that I never thought I’d be much good with a big pro-looking camera. I was convinced that small and simple cameras would be my fate, seeming to fit better with my self-perception of not being very technically minded.

Despite this, I decided some years ago to push my limits, so I purchased a Nikon D5100 in hopes of finding a way to express myself more creatively. It was either the Nikon or the equivalent Canon, but the D5100 just seemed to have some better tech-stuff inside – a marginally bigger APSC sensor, a well-regarded sensor also featured in the D7000, and the fact that I could use so many F Mount lenses. For about the same price as the Canon, it seemed to be a slightly better camera.

Waiting after a tiring day – Nikon D5100 with Nikkor 55-200mm DX

I wasn’t at all disappointed with the D5100. On the day I received it, I set about educating myself on how to use a DSLR. I’ll be honest – it was a bit intimidating. It was a very different and more complex camera than I was used to. After reading a lot and watching a lot of how-to and exposure triangle videos, I went out and did some night photography. I can highly recommend this practice if you want to learn about the importance of light in photography. You very quickly learn that light is everything when you’re running around at night with a cheap tripod and a shutter remote that only works half of the time!

For the Nikonians and other interested parties

I don’t have the D5100 anymore, but I do have a growing bunch of Nikons that many Nikonians would be familiar with:

  • Nikon D40 – It’s an old and small DSLR from Nikon, featuring a 6.1 megapixel CCD sensor. I’ve written more about it here. Paired with Nikon’s older kit kens – the Nikkor 18-55mm – it’s a great lightweight camera.
  • Nikon D70 – My copy is a bit on the used side, but it still makes great photos with the CCD sensor. Some say it has a definite cool bias, but that can be perfect for many types of scenes.
  • Nikon D7100 – This was my workhorse Nikon DSLR for a long time. I upgraded to it at a good price after selling the D5100 and what a difference it felt like upon opening the box! Unlike the D5100, it has more external controls and solid ergonomics that don’t feel plastic. It feels like a professional camera when contrasted to the D5100 !
  • Nikon Z5 – After a long time, Nikon finally entered the mirrorless game. The Z5 is every bit a modern mirrorless camera for a good price, considering the 35mm digital sensor. After using my mirrorless Olympus OMD EM5 cameras for so long, this feels both familiar and a huge upgrade in capability. As much as I trust my D7100, the Z5 is my new workhorse.
  • Nikon D200 – Released in 2005, the D200 features a well-regarded Sony-made CCD digital sensor. I regard it as one of the best early DSLRs from Nikon, as the camera market was shifting from film to digital.

I know that my Nikons aren’t exactly heavy enough to bow the shelving. It just feels like they outnumber my other cameras by a long way! Maybe it’s because I use them a lot, so I feel like I’m a brand loyal Nikonian? I’ve used my share of small junk cameras over the years, so it’s nice to pick up a big-name camera that just works when I want it to. I’ve had a few cameras die on me now – I’m looking at you, Sigma DP1 and Sigma DP2M ! I still don’t think I’m a brand loyalist, but I do like my Nikons.

Framing the sunset

How do you feel about sunsets? What do you think about when you’re watching the sun dip slowly below the horizon line? Are you an avowed opacarophile? I think most of us love a good sunset!

Fiery water – Nikon Z5

How do you go about framing a sunset? What decisions do you make when you compose? The so-called rule of thirds can be useful when framing landscapes like this. Typically, I’ll keep two thirds of the photo as sky, since this is usually where the most interest is – beautiful clouds and shifting colours. But as you can see in the above photo, I decided not to do that on this occasion.

My decision here revolved around the difficulty of balancing some of the brightest sections of sky with the reflections on the water. The dark shadowy landmass serves as a strong dividing line between sky and sea. I also found the texture and colour of the water more intetresting than the sky at that moment, so I chose to include more of it.

During editing, one sticking point was the brightest section of sky, right in the middle, casung me some visual distraction. The sun breaking through those clouds is strong enough to draw the attention away from the texture of the water. To address this, I opened it in Lighroom, selected a mask over that bright area, and lowered the highlights a little more. Doing this brought out some cloud detail and minimised it as a visual distraction.

I think it works OK. What do you think?

Two sunsets for the Opacarophile

The Urban Dictionary defines an Opacarophile as someone who loves sunsets. It would be fair to say that many people find beauty in sunsets. Certainly, at the end of a day out on the road, our thoughts turn to whether we’ll find a suitable spot to witness the sunset and make a good photo. There’s always some resigned grumbling when heavy clouds obscure the sun!

The importance of the setting sun

The setting sun signals the end of the day and the turning of the earth. One might ponder our long line of ancestors, staring at the shifting hues and watching the sun retreat below the horizon. Such an event reminds us of our smallness and our place in the world.

Evolutionary science suggests that when we experience the beauty of sunsets, we tap into our evolved aesthetic faculties – brain wiring that allow us to see the rightness or harmony of something in order to judge its value and health. A healthy mate is vital to produce healthy offspring and continue the species, so beauty in this context represents a healthy mate and potential long-term survivability. A beautiful sunset stimulates the same aesthetic faculties that allow us to determine the health of a potential mate and the rightness and harmony of things.

Perhaps that theory is a long-bow to draw for many! My favourite is the Biophilia Hypothesis, which I’ve mentioned in a previous post. The idea that humans are drawn to natural areas because we have a deep-rooted connection to them, having lived in such areas for most of our history, is a compelling one.

Two sunsets, two interpretations

Sunset, Meningie SA – Nikon Z5

Having spent much of the day driving around the Cooring, Meningie provided us with the most wonderful of sunsets. A variety of colours, shifting from moment to moment, reflected in calm water. This single sunset made up for all of the sunsets we missed. Can you spot the lone duck in the above photo?

I’m glad I had my Nikon Z5 with me for this. I’d attached the excellent Nikkor 24-70mm F4 S lens after deciding that my usual lens, the Nikkor 40mm f2, needed a break. I know that many photographers prefer a tripod for such scenes, perhaps combined with Neutral Density filters, but our day-trips are about chance and hope, best represented by hand-holding the camera and moving to the next potential aesthetic wonder.

Sunset, Meningie SA – Nikon Z5

What a difference a moment makes to the colours of a sunset! I’m being a bit cheeky, as the colour in the photo above is actually a momentary interpretation of the automatic white balance in the Z5. Once I saw what white balance it had chosen, I decided to stick with it. The first photo is much more like the original sunset we saw. I simply exaggerated the blues and pinks by setting a Tungsten white balance during editing. It’s one thing I’ve noticed in my Z5: the automatic white balance is sometimes over-eager. Still, I find it’s best to grasp these chance moments and chance settings!

Some street photos with the perfectly excellent Nikon D40

Having been very connected to my Olympus E-1 lately, I decided it was high time to take out another old digital camera in the Nikon D40. I don’t always get the chance to engage in street photography but when I do it can be a lot of fun. It does require a different approach though – being on the look-out for likely scenes and waiting for the right moment. The D40 isn’t exactly a classic street machine but it’s also small enough not to be much of a bother unless a big lens is attached, like the Tamron 17-50 2.8 I decided to go with!

Reaching for the stars – Nikon D40, ISO 200, F 2.8

I find that the D40 makes really nice photos, but the CCD sensor technology isn’t so great when you have to pull details out of heavy shadows during editing. The RAW files are flexible enough, but the heavy shadow areas can be a bit thin. These older sensors also aren’t so great at retaining highlights either, so you have to make the choice – expose for shadows or highlights when the lighting creates dynamic range that’s outside of the scope of the camera. This is similar to slide film.

Framed by yellow – Nikon D40

Even though there’s noise in shadow areas when you pull up the exposure during editing, the digital noise pattern isn’t objectionable. This is one area where CCD sensors had a clear advantage over their CMOS counterparts at the time – lower noise and a finer noise pattern. We seem to have come a long way since those early digital days, but cameras like the D40 still make perfectly excellent photos! How far have we really come, one might wonder?

Free hugs – Nikon D40

There’s also another nice advantage to using an old camera like this – 6 megapixels pairs really well even with a kit lens that doesn’t see a lot of love. The old 18-55mm Nikkor kit lens is much maligned but is nicely sharp on an old camera like this, since it out-resolves the 6 megapixel sensor. My Tamron looks even better and seems to pick up plenty of primary colours wide open. Still a perfectly excellent camera.

Green machines, rusty bolts, and dynamic range

The clouds are slowly dissipating after several months of grey days. This weekend provided an opportunity to drive around the vibrant towns of the Murray River. I packed my bag with the Olympus E-1, Nikon Z5, and the Sony RX100.

I continue to be impressed with the output from the old E-1, but dynamic range is limited, and careful consideration of a scene is required before clicking the shutter button, I’ve discovered.

Shadows on emerald metal – Olympus E-1

Window of opportunity

Every digital sensor (and film, of course) has a limited performance window within which it can optimally render the dynamic range of a scene. If the dynamic range (brightest and darkest areas) of a scene exceed the window, then an exposure decision must be made: crush blacks or burn highlights? Modern sensors have a bigger window, so provide more latitude. The E-1, not so much.

Scenes with plenty of mid-tones and minimal strong highlights / deep shadows are good for this camera. Evenly lit scenes are great too. With excessive tonal ranges, I usually crush blacks because it’s less distracting for the eye, but it depends on how numerous the extreme tonal ranges are and the composition I’ve decided on.

Unused, catching dust and webs – Olympus E-1

The onboard tonal response of the Olympus is contrasty. Again, great for evenly lit scenes that could use a contrast bump, but not so great for extreme tonal ranges where pushing them further causes distracting visual elements. The more I use this camera, the better I get at evaluating scenes before picking the camera up. And if I can frame a scene and limit the extreme tonal ranges, I’ll do that. I also commonly dial in some negative Exposure Compensation to protect highlights but only when I want to preserve better gradation of tone over areas where distracting highlights could be a problem. Evenly lit scenes don’t need it unless that’s the look I’m going for.

Beneath the old machine – Olympus E-1

Calibrated for the old film pros?

It’s clear to me that the RAW files from the Olympus E-1 are different to the RAW files we get from modern cameras, but I don’t think this is a CMOS or CCD issue. The native tonal response of the E-1 produces files that are already contrasty and punchy. The images on this page are essentially the RAW output with barely any editing at all.

Some people might say I should use OM Workspace to get the colour goodness from this camera, but the software remains awful to use. And the few RAW files from the E-1 I’ve loaded into OM Workspace produce much the same initial result as the Adobe Standard profile in Lightroom, though my testing isn’t extensive enough to warrant strong views.

So, back to my speculation on the punchy files from the E-1. In 2003, when the camera was released, digital photography wasn’t mainstream. It’s entirely possible that early cameras like this were internally calibrated to produce images that were as close to certain film types as possible in terms of punchiness and also required less editing in software. Remember,  there wasn’t a lot of RAW editing software around at the time.

None of that means these old cameras make filmic photos, but it may explain why there seem to be differences in output compared to our modern cameras. I think this is less about the inherent properties of a CCD sensor and more about what kinds of photos the film companies wanted us to see from their cameras via internal calibrations. Now that photo editing programs are numerous and commonplace, modern cameras that have more dynamic range than the E-1 are calibrated to output flat RAW files that can easily be edited. Just speculation, of course.

Around the emerald machine – Olympus E-1

More photos from Wycliffe Well

In my previous post, I spoke about the eerie ruins of the accommodation complex at Wycliffe Well. To the best of my knowledge, the large bush-fire in this area still rages uncontrolled. Such is the creation and destruction cycle of life in outback Australia. One day you’re listening to tourists recount stories about Min Min Lights and the next you’ve sold your long-term outback business and it now lies in ruins at the feet of new owners, unlikely to be repaired. Life moves on quickly and time is uncaring.

Anyone for the Ladies Toilets? – Nikon Z5

At this point in the road-trip, I was still getting used to the Nikon Z5. It’s a lovely camera, without doubt, but I need to get into the habit of choosing smaller F-stops to create a deeper depth of field when close to my subject. For many of these photos I used the excellent Nikkor 40mm F2 lens. I’m a sucker for prime lenses and this one is certainly good bang for the buck, despite the all-polycarbonate mount. It’s one sharp lens for sure!

House 2 – Nikon Z5

I also used the 52mm B+W Circular Polarising Filter. This helps to cut stray reflections and saturate the colours so editing isn’t so burdensome. But using the CPL is not for every occasion. It’s great for cutting reflections, deepening the colour of foliage, and good if you want to photograph water, but it does tend to make photos look a bit flat and unnatural at times. I find that I always need to add contrast during the editing process just to cut that flatness.

Your caravan awaits – Nikon Z5

As you can see, the skies also really come alive when using the CPL. Sometimes it’s a bit too much, honestly. One year, I remember using it extensively around Alice Springs and the skies looked so dark they were almost purple. Now, I twist the brass ring of the CPL until it hits maximum effect and then dial it back a little to add some natural reflection to the scene. I think I used it quite judiciously on this outback journey.

Welcome to the TV Room – Nikon Z5

The Z5 is very comfortable at ISO 6400 and I’m comfortable using it when required. I think I got away with ISO 3200 in the above photo and used Lightroom’s great AI-based noise reduction to smooth it all out. That’s a good use of AI technology, as far as I’m concerned. Really love that artwork too, though the TV has seen better days.

Diffuse sunlight – experimenting with cheap plastic and dreamy filters

For all of the great cameras and sharp glass on the shelves, it’s liberating to play around with low-tech options sometimes. Maybe there’s a scene in front of you with great lighting but a subject that has been overdone? Maybe you’re gear-fatigued and just want to try something else? Do you know what I do when I’m a bit exhausted with tech and sharp lenses? I put something cheap in front of the camera lens to see what happens…

Dreams of green cool – Nikon Z5 with cheap plastic

The time of day was right and the leaves were catching golden light but I was weary of the same tired approach. Sharpness is a state of mind! Great photos have been made with the most primitive film boxes. So, instead of doing the usual, I pulled out a flexible piece of clear plastic and stuck it in front of the sharp Z glass. As you can see, it pulls the light in different directions when moved about. After some Split Toning, Vibrance, and a decrease in Clarity, the photo has a nice dreamy look.

Dreams of a glassy sun – Nikon Z5 with Diffusion Filter and cheap plastic

Diffusion filters are a good idea when you want some highlight blooming and a softer tone to a photo. Though the Tiffen Black Mist Pro filter tends to be the top of the price and quality pile, my feeling is that dreaminess can be found in even cheaper materials. I purchased the K&F Concept Black Diffusion filter and it does just fine.

The sun photos were both made with the Black Diffusion filter in place. There’s some nice blooming around the sun, but that’s pretty much obscured by the use of the cheap plastic I used for the photo of the trees. Details are hidden, contrast is lowered, and only bright shapes remain.

A distant sun barely warms – Nikon Z5 with Black Diffusion Filter and cheap plastic

Tin, wood, and rust

There are dozens of old pictures on the SD card from my Sony RX100, many of them textures and abstracts. With these subjects, I prefer a photo that’s sharp enough to show the small details. Apart from some softness in the corners, the RX100 Mark 1 is possibly sharpest at an f-stop of 5.6. The combination of sensor and multi-coated Zeiss optics is a good match.

A nice arrangement of textures, shapes, and colours

There’s something distinctly Australian about rusty sheets of corrugated metal. In wandering around the streets looking for interesting scenes to record, a rather annoyed man asked what I was doing on his property. Though he was behind a fence, it seems that his property extended to what looked like public space. He insisted on this, despite my questions about how the area seemed to be arranged and how one could easily wander onto what he claimed was his turf. In the end, he permitted me to wander a little further as I assured him that I was uninterested in doing anything underhanded. It wasn’t worth the quarrel in the end, and certainly not worth the risk of harm.

The Australian summer can be very harsh. Though winters here are generally quite mild, climate change and extreme weather events notwithstanding, summers can be cruel to humans, animals, and building materials. Still, the combination of rust, metal, wood, and peeling paint is an eye-catcher, even on a cloudy day.

Speaking of clouds: not the greatest days in terms of golden light, but heavy clouds reduce harsh contrasts so that more detail is recorded in photos. Strong cloud-cover also means lower dynamic range, making it easier for the digital sensor to handle the highlights.

All photos were processed from Raw, though I’m keen to cut down on editing time and use a few custom JPG presets. In this context, I’ve set the RX100 to record both Raw and JPG files. This allows me to mess around with picture settings without relying on JPG output alone.

Public and private space

Whilst confrontation is often not worthwhile for photographers, there are certainly times when questioning laws and perceptions of those laws is applicable and useful. Being aware of where public space ends and where private space begins is important for photographers, especially if commercial intent is involved. And sometimes, it’s not clear where the private and public zones are.

Street photography has a long and rich history, but there’s a current cultural climate in which people are sensitive about someone pointing a camera in their direction. I can obstinately pronounce that the law and public space permits me to use my camera in this way, but laws versus people’s feelings is different. It’s also worth considering that there’s a difference between photographing a stranger in public space and being in that public space and photographing the texture of a brick. There’s far greater potential for confrontation in the former example.

I may quote my legal right to photograph strangers on the street, but often the risk of personal harm is not worth the effort to defend one’s rights. There’s also a question around ethics and recording the lives of some of the most vulnerable in society. Where does documentation end and voyeurism begin? The most vulnerable on our streets, dispossessed and struggling, are easily exploited. And is it ethical to exploit the most vulnerable for personal gain? Or should we take the longer view – that all such recording of people’s circumstances contribute to an important historical record?

Waterways and constructions – more pictures from the Sony RX100

Having scoured the SD card for older photos, I note my preference for framing textures, patterns, and abstracts with the little Sony RX. I expect the imminent arrival of a metal hand-grip to improve handling, as I’m always a little concerned that the sleek black metal body will one day slip from my fingers. It’s already a small camera, and since current second-hand prices for this model are not exactly cheap, replacing it would likely not be worthwhile.

Submerged in lovely green

There’s a small sea vessel beneath the floating seaweed and greenish water. It was one of those days where sun penetrated the water and highlighted submerged structures. I think this photo was made at an aperture of 5.6 and an ISO of 125 – the base ISO of the RX100. Noise is not even really an issue until you get to ISO 400 and above. Even then, modern denoising tools are great at what they do.

A rocky world of sand and seaweed

I especially like the blue in the picture above. Some people suggest that the RX100 biases towards blue/green on Automatic White Balance, but so far I’ve yet to find the AWB setting not to my liking. Of course, seaside photos like this are perfect if settings bias to cooler tones. Nikon cameras traditionally have a cooler bias, but that’s only ever an issue if JPG output is the goal.

Beams and struts

Rarely do I convert a colour image to black and white. Lightroom does provide some nice colour filter options, and I do recognise that black and white images can be powerful. In the photo above, black and white conversion has enhanced the beams, surfaces, and light and shadow.

RX edits

All of the photos in this post are from the RX100’s Raw files. My editing is fairly minimal, and includes some Contrast and Clarity boosts, as well as Vibrance. My sharpening is actually quite spartan, as the diminutive Sony applies some baked-in pre-processing. I believe that some sharpening is already applied, including chromatic aberration reduction, and distortion correction. Consequently, the RX100’s Raw files already look pretty good.

In terms of noise reduction, I don’t do extra at all at base ISO for any camera, as the noise pattern is already so low as to be invisible if print is the goal. I do like Lightroom’s AI-based noise reduction though. It makes pictures at 3200 ISO and above practically noise-free.