Uluru up close ~ a story of hiking, geology, erosion, and deep time

We looked up at the huge rocky dome, in awe of the ancient geological processes that had created it. Over 500 million years ago, before dinosaurs wandered the lands around the ancient sea that would one day become a national park and tourist attraction, Uluru and Kata Tjuta started to form. At such times, you realize the scale of the world around you and feel very small indeed.

Looking back in time: Uluru – Nikon Z5 with Nikkor 40mm F2 lens and Circular Polariser

Doing the 10km base walk is the best way to appreciate the vastness of Uluru. We were already exhausted from our 8km hike through Kata Tjuta the day before – those rocky slopes and winding pathways can be unforgiving on cheap hiking shoes! I once climbed Uluru in about 45 minutes, back when it was commonly known as Ayers Rock. No-one is permitted to climb it now, but you can still see the old climber’s entrance and the worn path that millions of tourists braved over the years.

From a distance, Uluru looks like it has quite a uniform surface, but up close is where you get to see the details – weathered sections of grey stone, streaks of white, dark caves that seem to make recognisable patterns, and the iconic red rock that signals high iron content. Both Uluru and Kata Tjuta were formed over millions of years as the soft parts of the Petermann Ranges were eroded, leaving only the boulders and rocks.

Uluru up close – Nikon Z5

Uluru takes on different colours, depending on the time of day and season. It can be bright orange at sunset one moment and then pink with purple and blue shadows the next. I posted a sunset picture in another post, though it was a rushed pull-over to the side of the road and the local police weren’t too happy we’d parked in a no-park area as they beeped us on a drive-by! You take your chances when you have a camera in-hand. There are some designated photo spots in the area for tourists, but they can be quite busy, and I’m not always best pleased to make photos that everyone else does.

The red bones of ancient Australia – Nikon Z5

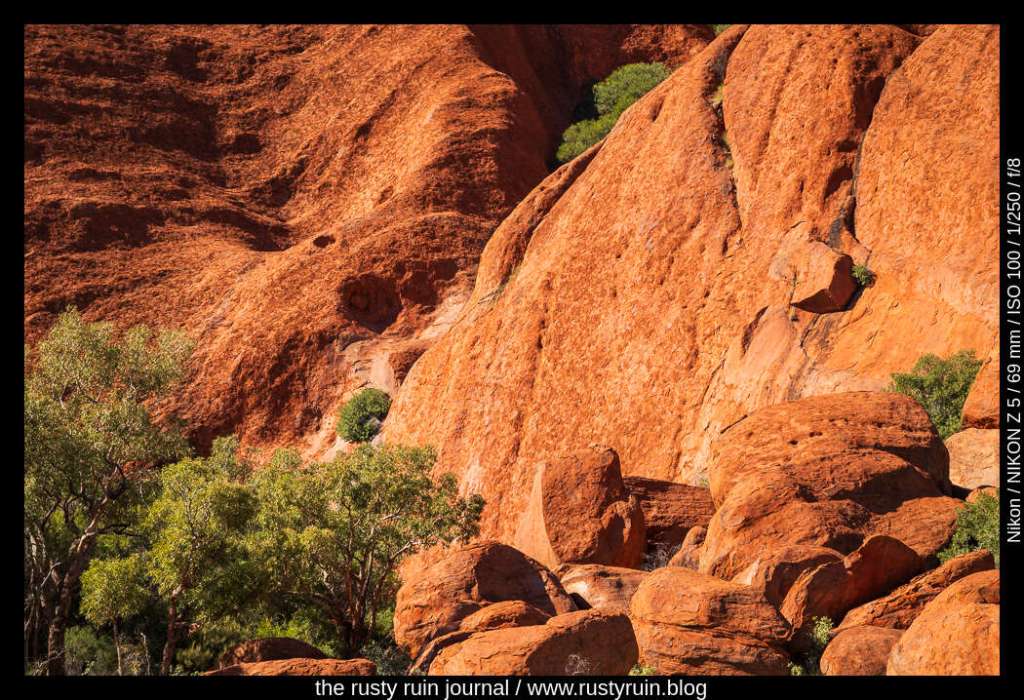
I was more prudent in my use of the circular polariser on this trip. Hiking around the base of Uluru, I was mindful of the location of the sun. The polarising effect is strongest when the sun is at a 90-degree angle to where you’re pointing the camera – so either on your left or your right. I dial it up so that the effect is strongest, and then dial it back a bit to add more natural stray light reflections back into the scene.

A polariser is fantastic for cutting out stray reflections on foliage and rocks and for deepening colours, but it can also make a scene look flat and darken clear Australian skies to the point of ultra-violet. It’s important not only to be mindful of where the sun is but also whether a polarised photo is what you want. Great for foliage and cutting out reflections on water, but not so useful when you want to preserve all the golden colours of a sunset. It’s also not useful in shady areas, so there was a whole section of the base-walk where I put it away.

Uluru detail: weathering and streaks – Nikon Z5

I’ve often thought of Uluru as the rocky heart of Australia, located not too far from Alice Springs. Amazingly, this monolith extends up to 6 km underground, so it’s much like a rocky iceberg. Absolutely worth visiting if you’re ever in a position to do so.

Tjoritja aglow ~ The West MacDonnell Ranges

The West MacDonnell Ranges stretches west of Alice Springs (Mparntwe) for 161km. The area is known as Tjoritja to the local Arrernte people, and includes magnificent natural wonders like Ormiston Gorge, Standley Chasm, and The Ochre Pits. It’s a huge area that rewards exploration and requires more than a single day.

West MacDonnell Ranges aglow 1 – Nikon Z5 and Nikkor 40mm F2 lens

Upon driving back to Alice Springs after a long day on the road, the sun hit the ancient earth just right, and we pulled the car over to a patch of gravel. Like a long red serpent from The Dreamtime, stretching across the land, the rocky ridges were awash in the sun’s eventide glow. The photos here really don’t do it justice. How can one encapsulate over a thousand million years of geological history? It’s a land that feels as old as Time itself.

West MacDonnell Ranges aglow 2 – Nikon Z5 and Nikkor 40mm F2 lens

In a rush to exit the car, switch on the Nikon, and frame the scene before the light faded, I was amused by my scurrying about in the shadow of those ancient red rocky giants of earth. How many people had done the very same thing – catch the red glow of sunset across the hard-edged boulders, crags, and rocky outcrops? Many millions of sunsets across that land and there I was, one small thing in the vastness, fiddling with my camera, hoping to stop time.

More photos from Wycliffe Well

In my previous post, I spoke about the eerie ruins of the accommodation complex at Wycliffe Well. To the best of my knowledge, the large bush-fire in this area still rages uncontrolled. Such is the creation and destruction cycle of life in outback Australia. One day you’re listening to tourists recount stories about Min Min Lights and the next you’ve sold your long-term outback business and it now lies in ruins at the feet of new owners, unlikely to be repaired. Life moves on quickly and time is uncaring.

Anyone for the Ladies Toilets? – Nikon Z5

At this point in the road-trip, I was still getting used to the Nikon Z5. It’s a lovely camera, without doubt, but I need to get into the habit of choosing smaller F-stops to create a deeper depth of field when close to my subject. For many of these photos I used the excellent Nikkor 40mm F2 lens. I’m a sucker for prime lenses and this one is certainly good bang for the buck, despite the all-polycarbonate mount. It’s one sharp lens for sure!

House 2 – Nikon Z5

I also used the 52mm B+W Circular Polarising Filter. This helps to cut stray reflections and saturate the colours so editing isn’t so burdensome. But using the CPL is not for every occasion. It’s great for cutting reflections, deepening the colour of foliage, and good if you want to photograph water, but it does tend to make photos look a bit flat and unnatural at times. I find that I always need to add contrast during the editing process just to cut that flatness.

Your caravan awaits – Nikon Z5

As you can see, the skies also really come alive when using the CPL. Sometimes it’s a bit too much, honestly. One year, I remember using it extensively around Alice Springs and the skies looked so dark they were almost purple. Now, I twist the brass ring of the CPL until it hits maximum effect and then dial it back a little to add some natural reflection to the scene. I think I used it quite judiciously on this outback journey.

Welcome to the TV Room – Nikon Z5

The Z5 is very comfortable at ISO 6400 and I’m comfortable using it when required. I think I got away with ISO 3200 in the above photo and used Lightroom’s great AI-based noise reduction to smooth it all out. That’s a good use of AI technology, as far as I’m concerned. Really love that artwork too, though the TV has seen better days.