It’s challenging to attain sharp photos when hand-holding a camera in low light, but I’m comfortable pushing the ISO on the Nikon Z5 to 6400 to force a faster shutter speed to avoid blur. Furthermore, the in-body stabilisation of the Z5 helps to ward off the worst of the shakes and vibration.
As I’ve admitted previously, I’m still guilty of using shutter speeds that are too slow at times! Maybe I’ve become too accustomed to large sensors and vibration reduction technology? It’s a good thing the Nikkor 40mm lens I had with me opens up to f2 ~ not super fast, but fast enough to allow more light to hit the Z5’s 35mm sensor in low light situations.
Sacred Heart Church – Nikon Z5
Between the black bars of the heavy gates, I positioned the camera, opened the aperture wide to f2, set to ISO 6400, and glanced at the exposure readout in the electronic viewfinder to see a measly shutter speed of 1/15th of a second. Knowing that a blurry photo was one tiny movement away, I braced myself with my arms tucked into my sides, held my breath, leaned against the fence, and left the rest to the in-body stabilisation of the Nikon Z5.
Apart from the softness at F2, the photo is acceptably sharp. I’ll always say that you can make great photos with all kinds of cameras, even film in tin boxes, but tools like sensor-based stabilisation do make some situations easier.
Red light/secure door – Nikon Z5 and Nikkor 40mm F2 lens
When framing up this photo, I noticed that lights from passing traffic illuminated parts of the door and wall. With my back to the road and my eye pressed against the viewfinder glass, I waited until I heard the diesel-stutter of a loud engine that likely signalled a truck. I half-pressed the shutter button to focus. A few seconds later, the vehicle’s lights created red shadows and streaks. I timed the shutter click just right.
A few nights ago, I was parked on a busy main road near the city, scoffing a greasy burger and fries and washing it all down with a lukewarm decaf. I needed to fill several hours while I waited for the Katy Perry concert to finish so I could ferry home a car full of tired and content family members. I’d packed my Nikon Z5 so I could take a walk in the cold and make some photos. Opportunities to wander unfamiliar neighbourhoods don’t present themselves too often, so it was a great opportunity to challenge my eye.
Rainbow rotunda – Nikon Z5 and Nikkor 40mm F2 lens at 5000 ISO
When I use my older Nikon DSLRs, I temporarily forget how technically capable the Nikon Z5 is. Nikon were slow to enter the mirrorless market after a false start with the petite CX system, but their Z cameras are high quality devices that are a joy to use. I’m often amazed at how clean the Nikon Z5’s photos can be. The Z lenses have a reputation for being very sharp, with the Nikkor 40mm F2 being a good example.
Behind the shops
Photos made at night are often challenging to edit because the quality of light is so different to photos made during daylight hours. Where we might raise shadows to reveal more detail during the editing process for a day-time photo, it usually makes more sense to obscure the details in dark areas of a night-time photo where the absence of light defines the image.
In the photo above, the inky shadows obscuring the ground and part of the fence define areas of the image that are illuminated. Brightening the shadows not only weakens the impact of the photo but also makes little sense when part of the goal is to communicate the quality and feel of the night hours – the difference between light and shadow, the quality of artificial light running across metal and brick, and the darkness of the hour. If the versimilitude of the photo is important, as it is in this case, it’s as important to communicate the quality of absent light as it is to communicate how and where light falls.
Rushing into the evening with a friend, the sun quickly setting and the rain threatening, I didn’t expect much. Perhaps that was part of the problem: bearing the burden of noisy expectation rather than cultivating a mindin synchrony with the quiet moments.
Defying prediction, the heavy clouds produced some amazing sunset colours. Having located the ruins of a house on a dirt road rarely used, we both scurried over and around twisted tin, old pipes, dark trees, sharp wood, and cracked wall sheeting.
The old chimney left standing – Nikon Z5 and Nikkor 40mm F2 lens
I dug around in my camera bag, fumbled with settings, attempted different angles, and yet I felt frustrated and rudderless. It was as though I felt both the heaviness of the fading light and the possibility of being confronted by an angry local. My movements felt too rehearsed and tired, my eye seemed jaded and stale – following the same movements and tracing the same lines it had done ten thousand times before. Perhaps there was nothing new in this scene? Nothing fresh enough?
The Old Hills Hoist – Nikon Z5 and Nikkor 40mm F2 lens
Having extra time to contemplate the scene and determine the best framing isn’t always possible when you take a last-minute opportunity to dash into the eventide glow. Sometimes, you’re not in the mood for making photos. Sometimes, you’re in the mood to watch the sun move quietly and the light turn to blue shadows without the camera at all.
Despite the weight of my expectations, or perhaps because of it, there’s an apocalyptic feel to the photos. As the world teeters on the brink of another war, it seems that the right scene found me at just the right moment with my camera, in synchrony with the world.
In my haste to post examples from the all-plastic Sima lens, I forgot to post one of the nicest examples of how the single plastic lens bends the light. Adam, over at Driftwood Imagery, has also been inspired to mess around with his own recently acquired copy of this lens.
Nikon D7100 and Sima lens into the sunlight
I’m not sure if I was paid in cash or gratitude (probably in gratitude, knowing my eagerness to experiment with old glass at the time), but it was nice to use the Sima lens at sunset. In the photo above, you can see how the plastic element creates blue, green, and purple chromatically aberrant auras around strong light sources. Everything blooms wonderfully. And while I’m in the mood to post portraits – a rare genre for me – here’s another from the same session. I swear to you that even though the pose and angle looks the same, I did actually take time to switch lenses!
Nikon D7100 and Pentacon AV 80mm 2.8 Diaplan projector lens
Note the bokeh bubbles in the photo above ~ a good example that’s sure to inspire interest from people who love characterful out of focus areas. The Meyer-Optik Trioplan range of lenses is known to produce such pleasant hard-edged background bubbles. A recent obsession with such bubbly bokeh has pushed second-hand prices up dramatically, though I’ve not checked recent figures.
I was lucky to snag the Pentacon AV 80mm 2.8 Diaplan some years ago ~ a projector lens made by Pentacon (Meyer-Optik was part of the company merger that formed Pentacon). It has the same optical triplet formula as the famous early Trioplans. The only downside: being a projector lens, you need to mount it and focus it, somehow. I used some PVC tubing and glued it to a cheap mount adapter to form a simple push-pull focus mechanism.
Bokehis just another tool in the kit-bag of the photographer. Sometimes you want everything in-focus and sharp, and sometimes you want great seperation between the subject and a super smooth background formed by a 16-bladed vintage lens iris. There are people who find Trioplan bubbles distracting and others who appreciate those gentle geometries. If we have the right tools to suit our photographic vision, and we understand their qualities and how to use them, we are a long way down the road to making the photos we imagine. Rather than favour a single tool, better to continue adding tools to our bag and treat them as equals on our journey.
And the model in question? Well, after I made some initial safety photos with what many people would call a normal modern lens and then experimenting with the Diaplan and the Sima, she ended up choosing the safe photo! I guess the bubbles don’t always appeal to the eye.
In the weeks leading up to our annual road-trip holidays, there’s a slow build of excitement that obliterates any pretence of work productivity during the final few days, for me at least. Questions around camera gear take root in my mind many months before setting off – what and how many cameras to bring? What lenses? Will I really need a tripod? How many bags and what kind?
In some sense, it feels as though this holiday in particular is partly about escaping the world’s current problems by escaping into and losing myself in the world. Photography can be therapeutic self-help in this way – reframing the world to suit our own narratives. As photographers, we look at things differently, composing and considering scenes and subjects before us. It’s a distraction from the pressing issues. We’re out there in the world, breathing in all that it offers, yet we’re one shutter-click away from reframing it to suit a story we want to tell so we can help ourselves.
The Panda’s exhausted – Nikon D7100 and 55-200mm Nikkor lens
Packing camera gear
Having recently purchased a Tenba Skyline V2 Shoulder Bag, I’ve been trying out different combinations of camera stuff for daytrips. I won’t have access to all the gear whilst we’re on the road, but a well-stocked easy-to-carry shoulder bag that sits with me in the passenger seat is going to be handy for quick stops along the way. Right now, I’m trying out this combination:
Nikon Z5 camera with the Nikkor 40mm F2 attached: This is going to be my workhorse camera. The 40mm Nikkor is about as sharp a lens as I need. I know there are sharper lenses, but this Nikkor is inexpensive, small, light, fast, and sharp. Ok, it’s an all plastic build, but it uses Nikon’s tough polycarbonate material, which seems to be quite durable. It may not be a classic but the results are excellent.
Viltrox 28mm 4.5 AF Pancake: It’s a third-party full-frame lens for Nikon’s Z system, nicknamed Chip, and it’s inexpensive. It’s also a strange lens – a true pancake lens (80g in weight), with a fixed aperture of 4.5, a 28mm focal length, a metal mount, part plastic and part metal body, 2 Aspherical and 2 Extra Dispersion lens elements, a USB-C port for firmware upgrades, and a mask that creates 8-pointed starbursts. I’m intrigued by this lens as it’s so odd. Auto-focus in a lens this small and this cheap is unusual. I think it will be much sought after in years to come, but what concerns me is that once the AF motor burns out, there’s no manual focus to fall back on.
Olympus OMD EM5 Mark 2 camera: Having gone back to using the Olympus lately, I’ve rediscovered the joys of a lightweight system with high quality. I use a metal grip to add a bit of heft and for better ergonomics. I’m testing out the Yongnuo 25mm 1.7 lens right now, so it’s attached to the camera. I could also pack the Sigma 30mm 2.8 DN Art lens, which is sharp and reminds me of a teeny-tiny Dalek when the hood is also attached.
Olympus Zuiko 4-5.6 40-150mm lens: This lightweight and rather small lens gives me an equivalent focal length of 80-300mm on the Micro Four Thirds system. If I want to be as lightweight as possible and give myself flexibility on the road, this lens is essential. Image quality is a bit on the soft side at 150mm, but that’s to be expected in a non-pro Zuiko lens.
Sony RX100: I generally take this with my in a day-bag whenever we go out. It’s so light and small and silent that I can use it indoors when I don’t want to bother with a larger camera and lens combination. This one fits easily in the front pocket of my Tenba bag.
Other stuff: Spare battery for the Z5, a micro-fibre lens cloth, a small wallet for 3 x 52mm filters (B+W Circular Polariser, B+W 10 Stop ND filter, and K&F Black Mist Diffusion filter), and an SD card holder for spares. I like the K&F Concept Diffusion filter at 1/4 strength.
Undecided: I’d really like to squeeze the Nikkor 24-70mm F4S lens in the bag but it’s pretty big and heavy. Finding a home for it in this bag with everything else is going to be difficult, but I think it may be a better option than carrying the Nikkor 40mm and the Viltrox 28mm. It will mean that the Zuiko 40-150mm lens has to live on the Olympus camera. Alternatively, I ditch the Olympus completely and carry the 70-300mm Nikkor ED lens attached to the FTZ adapter so I can use it on the Z5 – but this is a heavy and tall lens.
Behind the red door – Olympus OMD EM5 Mark 2 and Zuiko 40-150mm R lens – as you can see, even at 150mm, there’s acceptable sharpness available after some editing (contrast, clarity, and additional sharpening)
I was a little way up the dusty side-road with my Nikon Z5 and Nikon D40 when a big white 4-wheel drive roared past me and stopped next to our car, dust kicking up from the wheels. I knew it was a bad sign. I’d been here before. A few moments later, the car belted away down the dirt and turned onto the bitumen. Everything was quiet again and I gazed in the direction of the setting sun, hoping we’d be left alone long enough to make some more photos in the best light of the day.
Covered in old vines – Nikon Z5
I went back to work with the Z5, dialling back the exposure to preserve the highlights and waiting eagerly for the golden light to bathe the dusty corner we’d chosen for some evening photos. The quiet didn’t last very long…
Another big vehicle pulled up next to the ruined building we’d been training our lenses upon. I packed up my gear and started to walk back up the road to my buddy, suspecting he’d have to deal with a mouthful of abuse from the locals. I wasn’t wrong.
“What the FUCK do you think you’re doing???!”
I get it. There we are on a normally quiet road and we’re loitering outside his property. I made it there just in time for the tirade. My mate was very calm in the face of it, de-escalaing the situation and rightly pointing out we weren’t trespassing on his property and had no intention of entering or wrecking anything. Some minutes of back and forth and the property owner was still gruff but calm enough to take some mouthfuls of beer from the bottle he was swinging about.
Collapsing shed – Nikon D40 and Nikkor 35mm 1.8 lens
I contributed the odd word or two, reinforcing the argument that we were innocently making photos in great light and staying outside the fence-line.
“Yeah…I s’pose that’s OK if you’re into photography…”
Clearly his own mate was just there for moral support, as he’d said not a word the whole time. The golden light was fast fading and we were still locked in heated discussion about kids stealing copper from the old house and cutting the barbed wire fencing. The anger’s understandable, of course.
“Next time, ask me for permission! I’m just up the road, there.”
The problem with so many of these ruined places is that you just don’t know where the landowners are. Properties beyond urban areas can be big and it’s not always obvious who owns what. So, we stick to the public areas – the pathways and the roads, usually. Legally, you can make a photo of just about anything if you’re in a public space and you can see the subject from that public space. Permission isn’t required unless you’re planning to enter the property. I’ve never needed to say any of this to an angry onlooker or property owner, mostly because it doesn’t result in calm conversations.
A sea of cactus – Nikon D40
Finally, we made our peace and drove off. We’d missed the best light of the day. It would have been amazing too – pink clouds and soft golden highlights bathing all the dusty old corners and abandoned places.
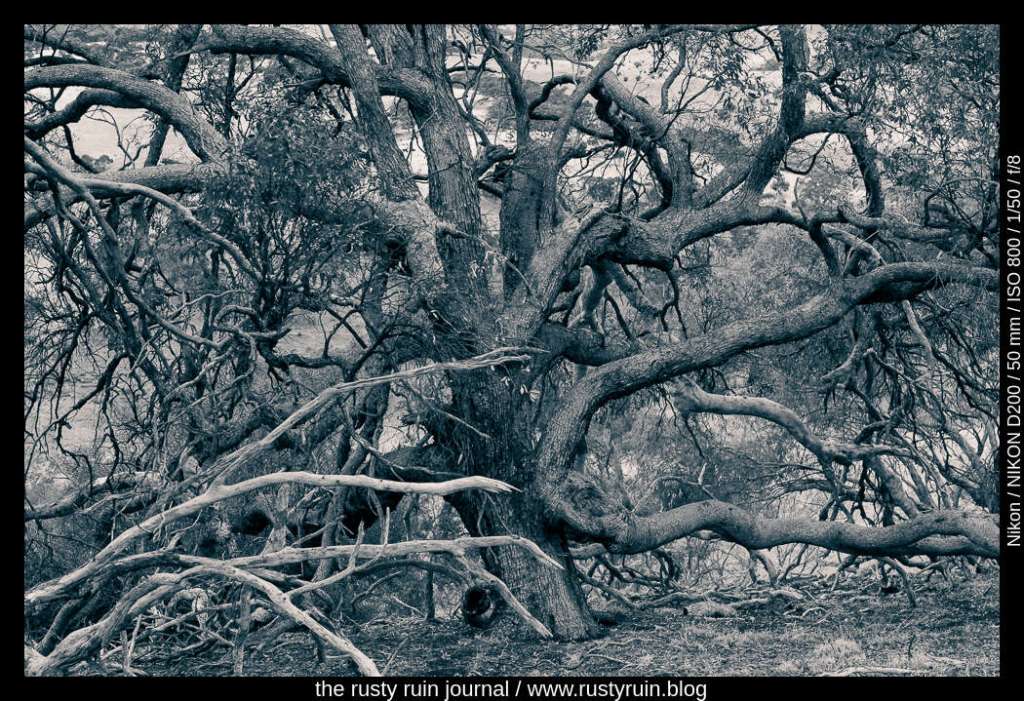
I’ve been trying to get out for shorter photo sessions in recent weeks because it’s not always possible to find a free day for an organised day-trip. At the very least, it gives me a chance to find some new locations and subjects. I can also pack a few older camera bodies and lenses without placing much pressure on myself to come back with plenty of photo winners. So, what do you do when the clouds are heavy, time is limited, the light is failing, and interesting subjects are lacking? Well, I happened to spot an interesting looking tree by the side of the road:
Twisting against the failing light – Nikon D200 and Tamron 17-50mm 2.8 lens
I don’t usually convert colour photos to black and white but sometimes it’s a good way to explore other qualities of an image. Black and white emphasises tonality, texture, and geometry. Just look at all of the twisting branches in the photo above. Even at ISO 800 in dull light, the Nikon D200 produces little noticeable noise. I didn’t bother to apply any noise reduction at all since the digital noise pattern is quite fine.
Here’s another version with more contrast, blue shadows, and warm highlights:
We looked up at the huge rocky dome, in awe of the ancient geological processes that had created it. Over 500 million years ago, before dinosaurs wandered the lands around the ancient sea that would one day become a national park and tourist attraction,Uluru and Kata Tjuta started to form. At such times, you realize the scale of the world around you and feel very small indeed.
Looking back in time: Uluru – Nikon Z5 with Nikkor 40mm F2 lens and Circular Polariser
Doing the 10km base walk is the best way to appreciate the vastness of Uluru. We were already exhausted from our 8km hike through Kata Tjuta the day before – those rocky slopes and winding pathways can be unforgiving on cheap hiking shoes! I once climbed Uluru in about 45 minutes, back when it was commonly known as Ayers Rock. No-one is permitted to climb it now, but you can still see the old climber’s entrance and the worn path that millions of tourists braved over the years.
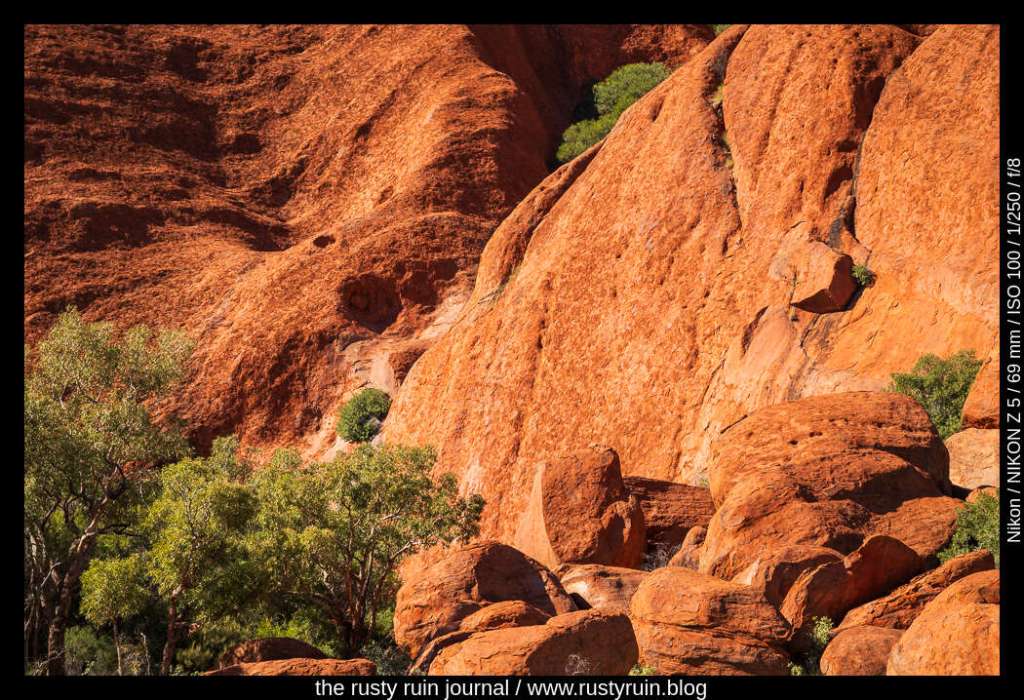
From a distance, Uluru looks like it has quite a uniform surface, but up close is where you get to see the details – weathered sections of grey stone, streaks of white, dark caves that seem to make recognisable patterns, and the iconic red rock that signals high iron content. Both Uluru and Kata Tjuta were formed over millions of years as the soft parts of the Petermann Ranges were eroded, leaving only the boulders and rocks.
Uluru up close – Nikon Z5
Uluru takes on different colours, depending on the time of day and season. It can be bright orange at sunset one moment and then pink with purple and blue shadows the next. I posted a sunset picture in another post, though it was a rushed pull-over to the side of the road and the local police weren’t too happy we’d parked in a no-park area as they beeped us on a drive-by! You take your chances when you have a camera in-hand. There are some designated photo spots in the area for tourists, but they can be quite busy, and I’m not always best pleased to make photos that everyone else does.
The red bones of ancient Australia – Nikon Z5
I was more prudent in my use of the circular polariser on this trip. Hiking around the base of Uluru, I was mindful of the location of the sun. The polarising effect is strongest when the sun is at a 90-degree angle to where you’re pointing the camera – so either on your left or your right. I dial it up so that the effect is strongest, and then dial it back a bit to add more natural stray light reflections back into the scene.
A polariser is fantastic for cutting out stray reflections on foliage and rocks and for deepening colours, but it can also make a scene look flat and darken clear Australian skies to the point of ultra-violet. It’s important not only to be mindful of where the sun is but also whether a polarised photo is what you want. Great for foliage and cutting out reflections on water, but not so useful when you want to preserve all the golden colours of a sunset. It’s also not useful in shady areas, so there was a whole section of the base-walk where I put it away.
Uluru detail: weathering and streaks – Nikon Z5
I’ve often thought of Uluru as the rocky heart of Australia, located not too far from Alice Springs. Amazingly, this monolith extends up to 6 km underground, so it’s much like a rocky iceberg. Absolutely worth visiting if you’re ever in a position to do so.
Some years back, I remember making photos of an Australian White Ibis – a wading bird that’s native to the country. It was a very sunny day and there was lots of light and shadow. In other words: lots of dynamic range for the camera to manage. Fortunately, the Nikon D7100 manages dynamic range pretty well and still stands up as a solid crop sensor camera today.
By my own admission, I was rushing and didn’t choose settings carefully enough. Here’s what the original photo looks like:
Australian White Ibis (original) – Nikon D7100
You can see how much dynamic range is in the photo – the feathers are bright white in the sun, and the interesting part of the photo – the head of the bird – is mostly in shadow. I probably should have switched to Spot Metering and focussed on the head of the Ibis to lift those shadows and preserve detail. That would also have blown out more of the bright parts of the feathers, so there’s a choice to be made. The other option is using a tripod and bracketing the shots to find a better exposure or stack them for an HDR edit to preserve as much dynamic range as possible. But it’s a living creature, and messing around with settings is not always ideal.
I had a stab at editing this old photo in Lightroom to see what could be done with it:
Ibis in blue – Nikon D7100
As you can see above, I was able to pull an impressive amount of detail from the Shadows. Despite the feathers looking blown out, I was also able to recover a lot of detail by pulling down the Highlights. I cropped to a 16:9 ratio to emphasise the length of the Ibis and the beak. Cropping out part of the highlights on the feathers brings more attention to the head of the bird and lessens the visual distraction of the bright white. I think it also balances the serpentine curves of the Ibis as the eye is drawn up the body, over the head, and down the beak.
I masked the background out and made the exposure, shadow and highlight adjustments seperately on the Ibis. By using a mask like this, my edits didn’t affect the background at all, and enabled me to duplicate and invert the mask and then alter the hue of the background through a colour dropper selection. Additionally, I applied a colour mask to the head of the Ibis and raised the exposure slightly, just to bring out even more detail. Finally, I converted to black and white and then applied a global colour in the Split Toning panel to create the cyan look. This is a simple way of emphasising texture and tone, and hiding stuff like chromatic aberrations or visually distacting colours.
Some days it’s hard to ignore the culture wars that shoot back and forth viciously on digital threads or the hurried whispers of people who feel the uncomfortable cultural shift beneath their feet. I wonder whether we’re just living through especially tumultuous times or whether this has always been so? It has always been so, of course, because nature is change. Even the universe changes from moment to moment. It’s a truth some try to resist and others embrace. Often, we embrace it when young and ossify with age. That’s our nature too. Today’s passionate culture warriors become tomorrow’s slow-moving dinosaurs.
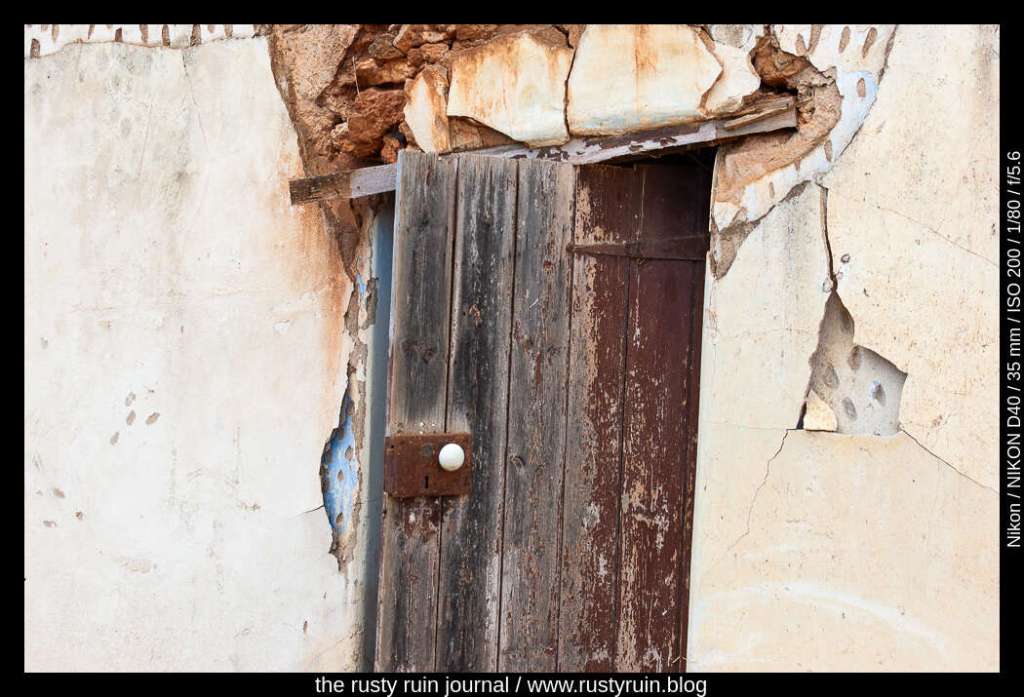
A door used no more – Nikon D40 and Nikkor 35mm 1.8 lens
I’ve always thought it unwise to commit too fully to a rigid set of beliefs. This is not to say belief systems are unreasonable or bad – humans seek meaning in all areas, and belief provides the framework for living in a universe that’s so vast as to cause us terror in dark and quiet moments – if you subscribe to Terror Management Theory. We cling to each other for warmth, just as we cling to belief like a security blanket.
We so often make the mistake of assuming our own beliefs are real and true and that they transcend time. Rather than understanding others deeply and cultivating compassion, we too easily find the beliefs of another person wrong, placing it on a rigid moral spectrum that functions as our own personal guide to undertsanding a seemingly random existence we seek desperately to understand, contain, and explain. In this way, we comfort ourselves.
The old entryway – Nikon D40
If we believe the universe has a moral structure inherent, we also tend to find a moral structure in the world and find our beliefs aligning strongly with it. If we believe the universe is mechanistic and chaotic, without moral structure, we align our personal narratives to this view instead. We find that life’s purpose and meaning is tied inextricably to our most basic beliefs about reality. We may be trapped within them at the expense of understanding other people. Either we’re islands of meaning, separated by uncrossable gulfs, or human beings attached to each other by common bonds. Perhaps both.
The tall church along the old road – Olympus E1
You don’t want to be on the wrong side of history, people sometimes say. For me, there is no right or wrong side, just people who have their own personal narratives, clinging to meaning. We’re all in the vast river of history together. It flows all around us. We’re part of the change happening from moment to moment, whether we embrace it or resist it. Neither approach is right or wrong – just ways of living and surviving and finding purpose and meaning.
Uluru at sunset – Nikon Z5
I love geology and astronomy. I like the feeling of placing myself in the context of deep time – the kind of time that barely notices our existence because we’re fresh and new. In this way, I place human life in the context of more ancient things. Uluru, the famed monolithic red rocky heart of Australia, started to form 550 million years ago. It was here long before we were. It started to form when multicellular life dominated the planet, long before dinosaurs roamed. Imagine that?
When you look up at the stars, those photons hitting your retina have travelled for countless light years. They’ve struggled and twisted up through impossibly dense super-heated layers of distant suns – the forges of our universe – careened through the cold depths of deep space, entered your eye, hit your retina, and then been processed as a visual signal by your amazing mammalian brain. In this way, we’re all connected to the stars. I love that thought.